For this week, I wanted to build upon the prior week focused on networking. I decided to replace the LED with an LCD screen with the goal of outputting a message written in the terminal. This would be using the interface to send a message. I decided to continue to use the Raspberry Pie Pico W. I purchased two different LCD screens at Micro Center to test.
First, I needed to connect the RPP to wifi. I used Thonny to make this connection and set up the web server that would enable messages. I used ChatGPT to help with code, but I went through the code and worked with ChatGPT to make sure I understood all of the elements. The code for this step is shared in the link below.
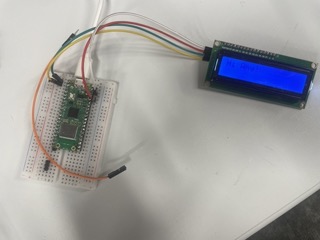
The next step was to connect the message entered to the LCD screen. The first LCD screen that I tried was an Inland 1.3 inch OLED graphic display. I wired this with the RPP on a breadboard. I used Thonny for the code. After hours troubleshooting, I still could not get it to work. It did not seem that even the power was working. I could not figure out the bug and decided to switch over to the other LCD screen: a 1602 I2C Module. This one was simpler to wire and seemed the better option for a beginner.
The second LCD screen was also not working. I thought it was an issue with the libraries and downloaded and tried several different libraries on the RPP. After a couple hours of working through debugging and trying to troubleshoot, I realized there was a small knob on the bottom of the LCD screen that needed to be turned. Once I did this, the LCD screen displayed the message.